It is very desirable to have a heated build platform and unfortunately the Ultimaker does not have one. Therefore users have to improvise their own versions. Basically there are two common ways to provide the heat but as usual there are exceptions. Typically the heaters are used to heat a glass plate that acts as the built platform. The big advantage is that it is easy to get a flat glass plate and it can easily be cleaned off without worrying about damaging the original acrylic plate and tapes.
1. Using a printed circuit board with the copper tracks used as resistance and therefore acting as a heater. The practical obtainable resistance is rather low so it is normally powered by a low voltage power supply at high current. The Ultimaker’s power supply is much too low power to be used so users have to obtain an external 120/240VAC to 12V or 24V DC at high current to power the heater. Often it is controlled through the Ultimaker either directly or through a relay.
2: The other common choice is to use a flexible mains powered heater that is directly power off the mains and no extra power supply is needed. The heater can be controlled as described above or often an external low-cost “PID” temperature controller can be independently connected to control the temperature.
In the case of mains powered heaters they typically come in rectangular blocks and often significantly smaller than the desired glass size. To evenly distribute the heat they are attached to an aluminum plate that then in turn is supporting the glass plate.
A common negative comment about mains powered heaters are safety. That is also an issue with the high power external low voltage power supplies since they also need to be wired properly so there is a safety factor there too.
My Heated Bed.
Since I had both mains powered heaters and external PID temperature controllers it was easy to use that as a starting point. The original Ultimaker bed is 242 x 242mm I bought a slightly larger borosilicate plate glass that is an off-the-shelf size in the USA, 254 x 254mm (10 x 10 inches) and 6.6mm thick. I made a machining 3.2mm thick aluminum plate for even heat distribution. The two heaters used have a combined heating rating of 170Watt. The bottom below the heaters is covered by 6.5mm fiberglass insulation.
Power Measurements:
I programmed in 65 °C and waited until a stable temperature had been reached and then I measured the power used just to keep the correct temperature. Another ways to say the some thing: Since the temperature was stable, that must be the continuous power lost to the ambient.
First I measured without the insulation: The power loss was 51W.
After adding the insulation I repeated the measurement. The power loss was 41W, a reduction by 10W. The power reduction would be more significant if a higher temperature was used for ABS. Also the added insulation will allow it to reach higher temperatures.
Timing Measurements
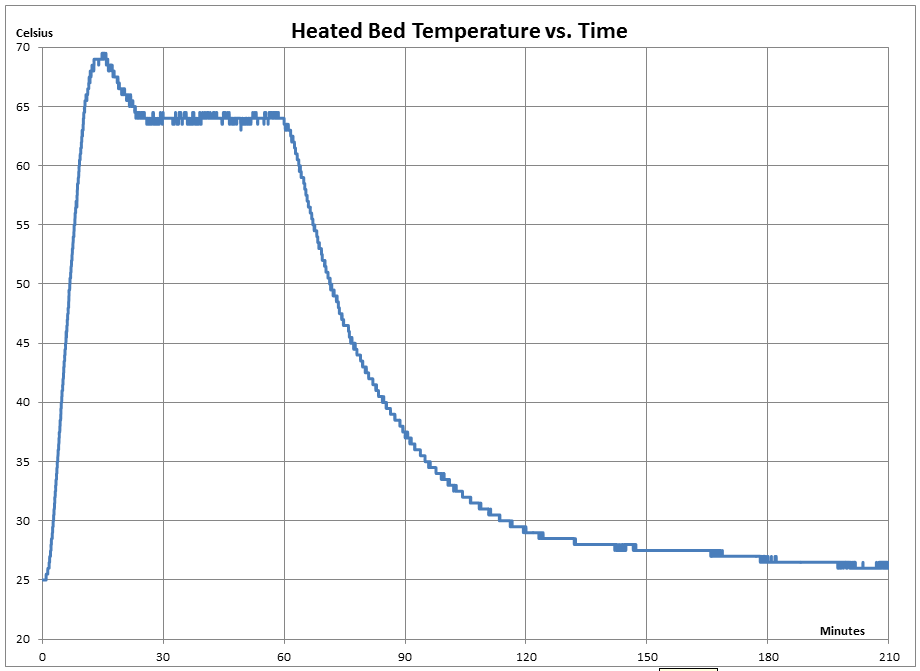
To verify the theory for the time to each the set-point I plotted temperature vs. time. Although not obvious, if the theory is not considered, there is not a significant difference reaching the 65 C set point with or without insulation. The reason is that almost all energy goes into raising the glass and aluminum plate to the higher temperature.
This brings up an important point: The thinner the glass, the faster the warmup. The same thing for the aluminum plate. In my case the glass is unnecessarily thick and maybe the aluminum plate too. A heater that would uniformly match the glass would be another improvement since no aluminum plate would be needed. Below is a typical heat-up and cool-off graph. With a small desk fan it cools off very fast when needed. After taking the data I have fine-tuned the PID temperature controller to reduce the overshoot.


Hi Bertho,
I used normal glass initially, but ditched it after talking to an architect friend of mine. He basically reminded me that the window glass that you can get from a glazier’s shop is created to specifically insulate against what’s on the other side. After that discussion I had an aluminium plate cut and my heated bed heats of MUCH faster with it. It is super-smooth to use just aluminium + kapton. I highly recommend it!
I read a discussion on RepRap forums where the topic was the thickness of the Alu sheet. Some had used 2mm had had problems with warping when the metal was heated. I read through all the comments (sorry. can’t find the link) and went for 4mm. It’s been very stable in combination with my PCB heater.
J
Glass conductivity is much lower than aluminum as you wrote but I do not think it is intentionally made that way as implied by the architect.
Regular aluminum plate can be significantly warped and still in specification. The good thing to look for is “Tooling Plate”. Usually it are ground to flatness and stress relieved.
That is really interesting, You are an overly professional blogger.
I have joined your rss feed and stay up for looking for more of your
great post. Additionally, I’ve shared your web site in my social networks