Introduction
When scanning an object with a laser or mechanically probing it to digitize the object and convert it to a 3-D computer model, it is desirable to accurately rotate it on a well-defined axis. It simplifies the conversion math and it speeds up the process. Further, if the rotation is done accurately in known increments it also simplifies the task further and increases the accuracy of the conversion. It is easy to make a poor turntable but the goal is to make a perfect one with simple tools and low cost. Here are some suggestions on how to achieve that.
Design Concept:
The key ingredient is an old regular 3.5" in hard drive. Old hard drives are everywhere and very easy to find. Here are the basic steps to convert one to a turntable although it is not intended to be a step by step instruction. First, remove the cover and that is usually the hardest part since most people do not have the required special screwdriver tips. Bring the drive to a hardware store and find the right one. Remove the top, and unscrew the head assembly and to clean it up also remove the electronics on the back side. An added benefit: You will also find two "super magnets" inside the drive. Afterwards it will look something like this:
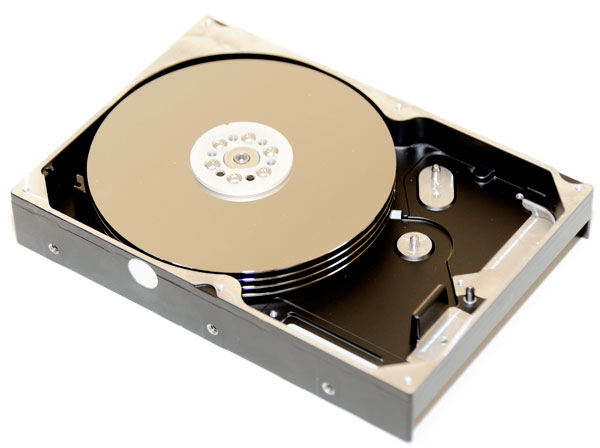
If just an accurate turntable is wanted there is no need to go any further. Place the object to be scanned on the center of the plates and rotate to the desired positions. No wobble or play, just beautifully smooth movement. There is a very slight chance that a drive could have bad bearings but that would be very unusual. If so, start over with another drive.
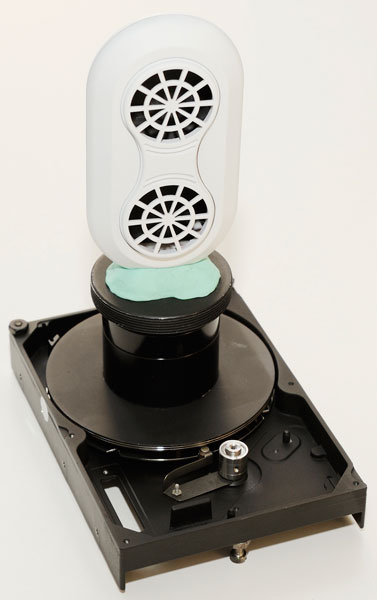
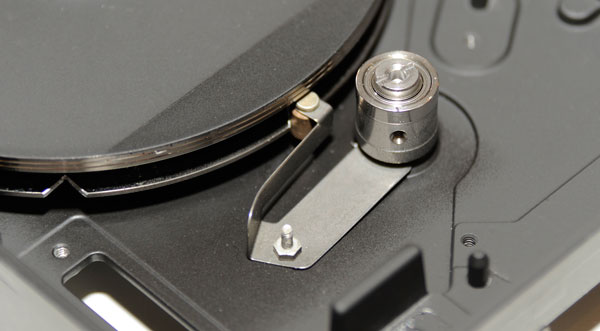
Since I wanted a "Perfect" turntable I also wanted it to be able to accurately index to fixed positions. In my case I chose every 45 degrees that will then give eight views of the scanned object. Since I have access to accurate machining equipment I removed one disk and machined a V-shaped notch accurately very 45 degrees. I then placed a spring load little roller from a micro switch to snap into the V notches. As a last step I painted the shiny platter black to avoid extra laser reflections. To place the object at the desired height I used camera lens extensions tubes that I happened to have around. See the top picture for the full assembly and the Index details below.
No Machine Shop?
Do not give up on indexing yet. Very good results can be achieved with a regular file and a paper clip. Print the notching guide below and cut out the center section so it can easily be taped to the platter. With a scissor cut around the peripheral to make it easier to handle. Then with the corner of a regular file, file a very small notch at each line. It only needs to be 1mm or so deep. Remove the guide paper and reassemble the stack. Take a paper clip and bend it so it will act as a spring-loaded stop and attach it to the bottom with one of the removed screws. Now you have repeatable indexing turntable too.
Software:
I am using the following programs to operate the system. The main program is "David Laserscanner" from
http://www.david-laserscanner.com/. It has excellent support and a good user forum.
I have also experimented with a mechanical touch probe and that software can also be used with a laser scanner. To import and convert the point cloud an excellent and very low-cost program with fantastic support called AccuTrans
www.MicroMouse.ca is used. Finally for further manipulating of the mesh a program called MeshLAB is used,
http://meshlab.sourceforge.net/.
It is an Open program with many interesting features that I am just starting to learn about.
Here is the link to the Touch Probe:
http://www.vinland.com/touch-probe.html
Download Notching Guide
Bertho Boman
Vinland Corporation
11600 NW 20th Street
Fort Lauderdale
FL 33323
(954) 475-9093
Email: boman33 at vinland dot com
www.vinland.com
|